Hello world,
In this article, I will show you how I would implement the AEP Web SDK for the datanalyst.info website.
This requires several steps that we will realize together and are as follows:
- Schema & Dataset creation
- HTTP API inlet creation
- Edge Config ID creation
- AEP Web SDK setup
- Config
- Data Element
- Rule
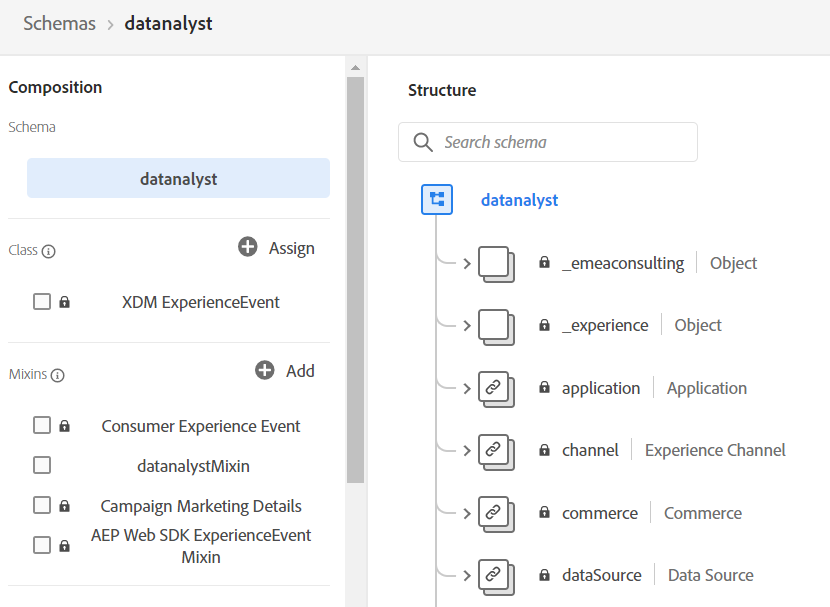
Schema Creation
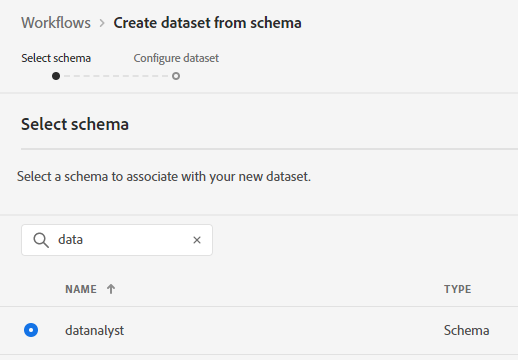
The first element that you would need to have for the implementation of the AEP Web SDK is a dataset.
However, a dataset is based on a schema so we need to establish that first.
For the schema creation, the AEP Web SDK needs to use the ExperienceEvent class so that it can collect multiple events with a timestamp attached to it.
Because we have the AEP Web SDK to use for collecting information to AEP, we can add a predefined mixin for that: AEP Web SDK ExperienceEvent Mixin.
I ended up adding the Consumer Experience Event mixin where I can actually add my tracking codes in the marketing (not displayed here), and obviously I created a specific mixin to capture some information:
I would always encourage you to use some predefined mixin as much as possible for some elements.
Especially, as AEP will probably first enhance the predefined mixins first before trying to fix compatibility with custom mixin.
The AEP Web SDK one is a pretty useful, however, there is nothing wrong by creating your own mixins. The power of AEP is that it can be very flexible on the way you want to set it up.
As you can see, I have created an object to hold my own personal fields but you could add more than object, you could add array or map as well.
Dataset creation
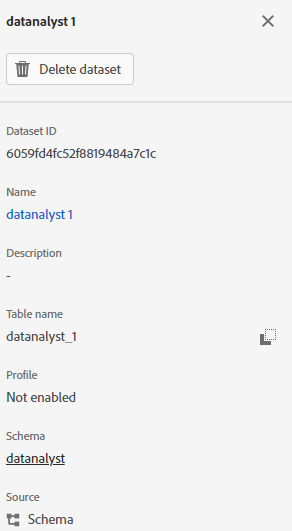
Once we have setup our schema, we can create the dataset pretty easily following the UI:
This is straight foward and we get the information that we want to have in the overview of that dataset already:
- Table Name
- DataSet ID
- Schema related
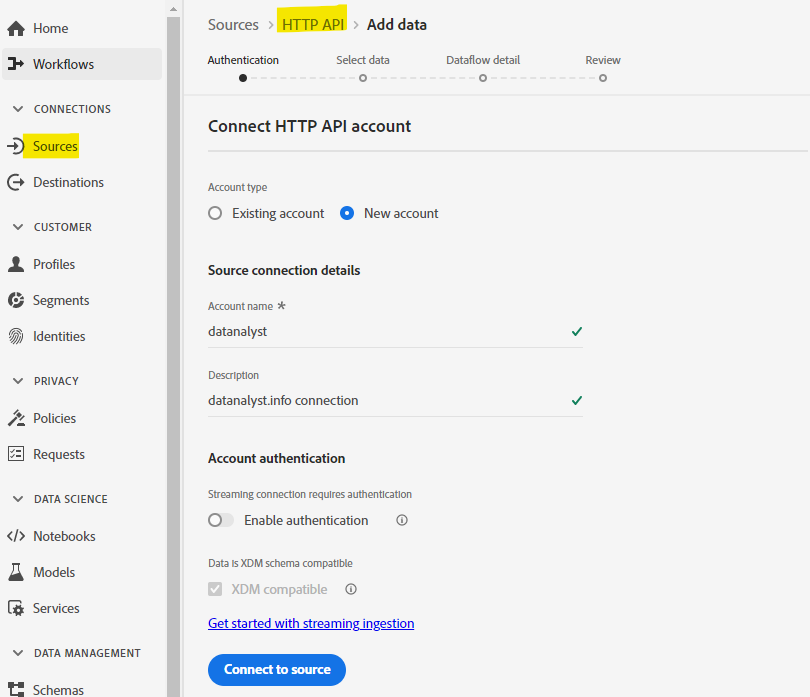
Creating your source connection
There are several way to create your source connection to ingest data to your dataset, there is the UI way and the API way. You may not believe me but the API way may be more straightforward and more powerful.
However, in our case, we will use the UI way and see how to do that. I will cover the API way in another post.
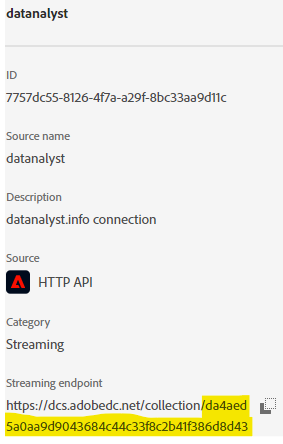
To use the AEP web SDK, you need to generate an inletId.
What is an inletId?
It is the last part of your streaming endpoint.
In order to achieve this, we will need to go to Source and then select HTTP API.
You can create a new connection if you prefer to have a different endpoint for your application. There is no limit on the number of accounts you can create:
In the API tutorial, you will understand what the “Connect to source” button is achieving, but for now, let’s say that it created the endpoint. 😉
You will need to connect to your dataset:
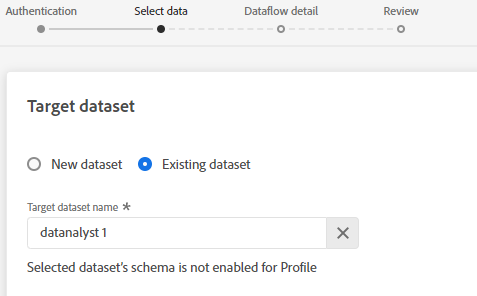
Once you have setup a Data Flow name, you can actually finish the connection by a review.
Note that there is an assignment expected but it would be possible to use the Mapping Service to map the different data ingested to their correct location in the schema after ingestion.
This is possible via the API but not yet (moment of this article creation) via the UI.
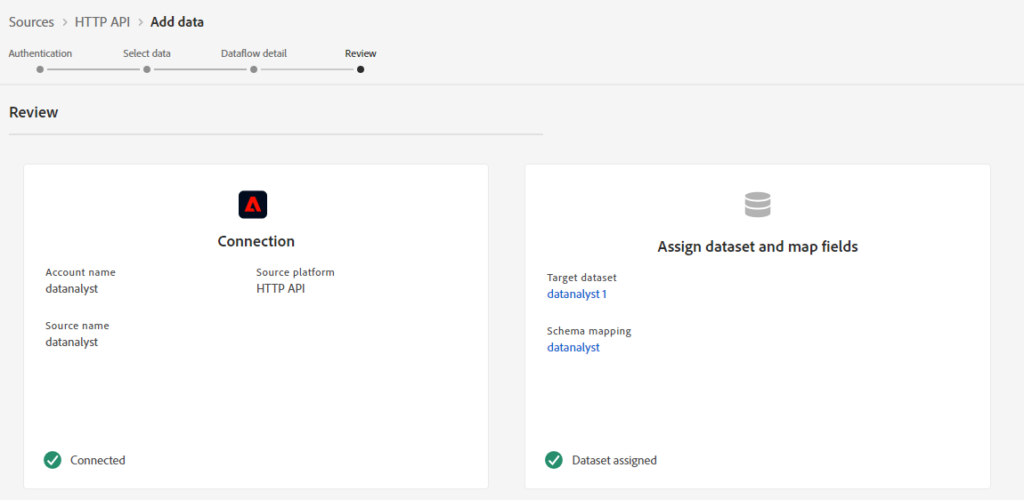
This is creating your connection and account for the streaming endpoint.
The yellow part on the screenshot below is your inlet ID.
Once we have created our inlet ID, let’s use it for data collection.
In our case, we want to create AEP Web SDK connection in Launch.
AEP Web SDK in Launch
I could implement the AEP Web SDK via pure JavaScript and I always like to do that because this is where you can really understand the library capability.
I am not a big fan of adding a UI and limit your option to what the front end team has provided but let’s be honest, this is going to be the default implementation for 95% of the folks out there. Therefore, I will demo it.
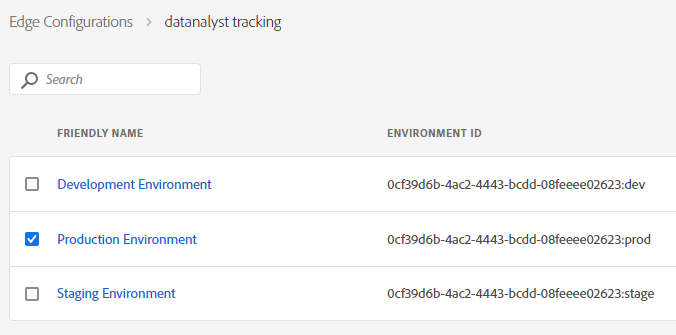
Generate the Edge Config ID
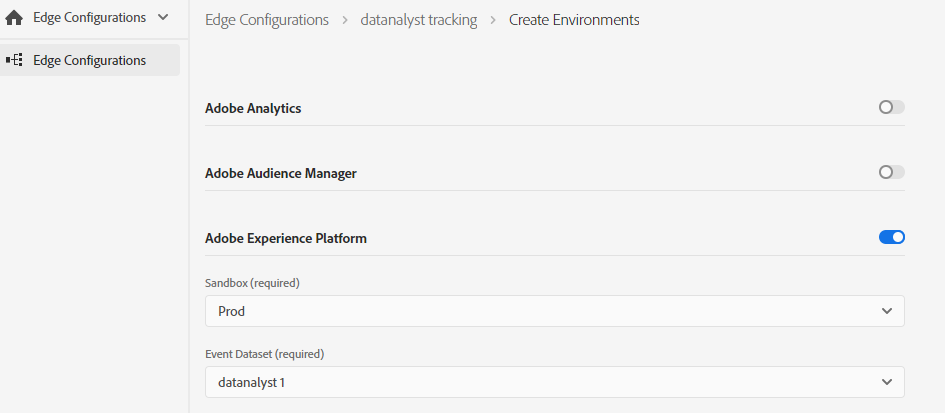
The first thing that you need to do, either you are using the Extension or not, is to generate an Edge Config ID.
The Edge Config ID can only be implemented by the UI setup of Launch at the moment. You need to request your organization to have the capability to do that within Launch.
As you can see below, I have the “Edge Configuration” option where it is usually the “client side” element.

The Edge Config ID will enable your tracking to be send to the correct AEP instance but also to forward the data to other services if needed. I explained a bit in another article that the data will be sent to the Konductor, where the XDM message will be dispatched according to your setup. Link to that article.
My configuration will be pretty easy as I want to only send data to Platform.
As explained briefly above, you have the possibility to forward the data to other tools as well.
This gives you the ID that you can use for your implementation of the AEP Web SDK:
In my case, it is starting with 0cf…etc…
AEP Web SDK Extension
From this moment, you can use your Launch “Client Side” implementation and install the AEP Web SDK implementation.
You can see in my implementation that I manually entered value for the edge Configuration because my Launch instance is not set on the same Experience Cloud than the AEP instance. So Launch cannot automatically detect it.
I also had to changed my IMS organization ID to match the one I am sending data to.

You will need to select some additional configuration for your privacy so be careful of your setup.
Once you are done with your choices, then you can save… and start implementing in the rules.
AEP Web SDK in Data Elements and Rules
When you want to use the AEP Web SDK on your Launch implementation, you would need to create a data element to hold you XDM message.
That means… you need to create LOTS of data elements to easily use the XDM schema creation.
You will see on the XDM schema data element that you have some elements already prefilled thanks to the AEP Web SDK.
However, you don’t have your custom fields in your mixin matched (obviously) and you cannot code directly in that XDM data element.
You can “only” fetch other data elements, hence the need to prepare for all of the fields and create lots of data elements in advance.
In the screenshot below, every element with a star (*) are the ones prefilled by the AEP Web SDK.
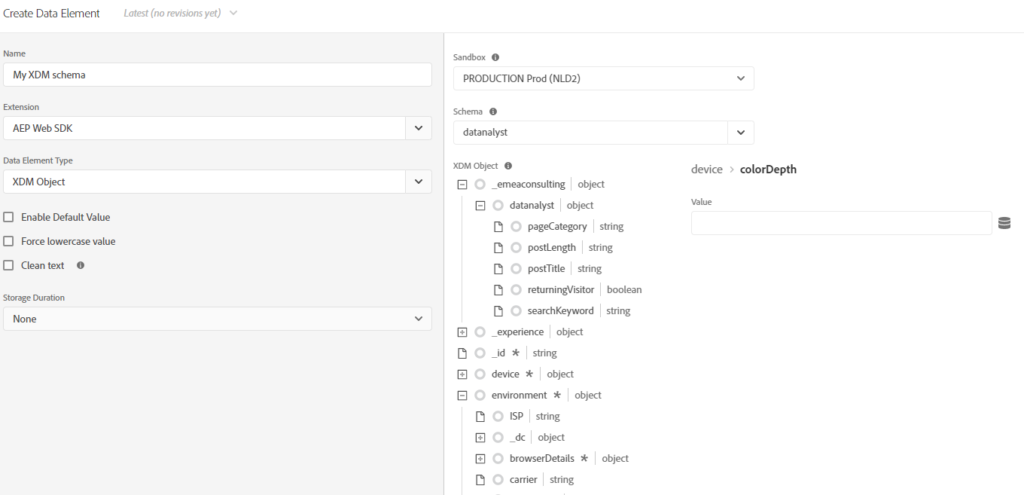
As you can see when I selected device > colorDepth, I have the option toselect a data element directly.
I will pass you most of the details now as it is just about Data Element creation and mapping them.
The null issue
What I would recommend, but it is not required, is to have several “XDM data elements” for different schema filled. Same schema but different level of “fillingness”.
Especially if you have some additional identities to send in your payload, like CRM ID or anything like this.
You may want to have one XDM data element for your general tracking purpose and some additional “XDM data element object” for when you have additional fields populated.
The problem of the schema (fields) is that they are expecting a specific type for your data.
I have set a string type for most of my fields, so if I send something else (like null or undefined), the message will get invalidated during ingestion time.
So either your always return something, like empty string (“”) or you have several XDM data element, as I proposed, for the different level of fillingness of your XDM object.
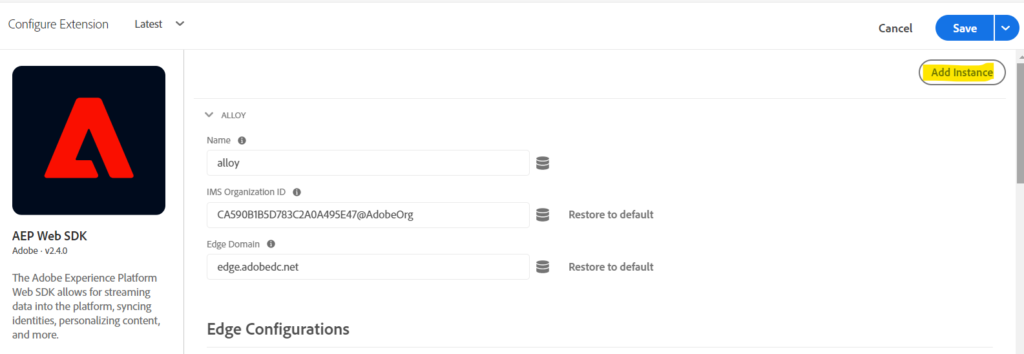
Adding several instance of AEP Web SDK (Alloy)
One “easy to miss” feature is the capability of alloy to have several instance.
Please do understand that it means sending data to different datasets or more precisely with different configId used.
You can find that capability in the top right corner of the Extension today and that is a great way to add more flexibility on your implementation logic.
I can totally imagine using different instances, one to send data to a “Analytics only” consent dataset and another configId to send data to a “marketing activities” consent dataset.
I am just saying… it obviously depends on your decision with your Legal department.
Sending Data to AEP with rule
Once you have your data element created, you can use Launch the same way that you ever used, creating a rule to send data, but this time with the AEP Web SDK extension.
The only trick is that you have an Action to set Consent before using the data.
Most likely, you want to use a Data Element to fetch the consent status.
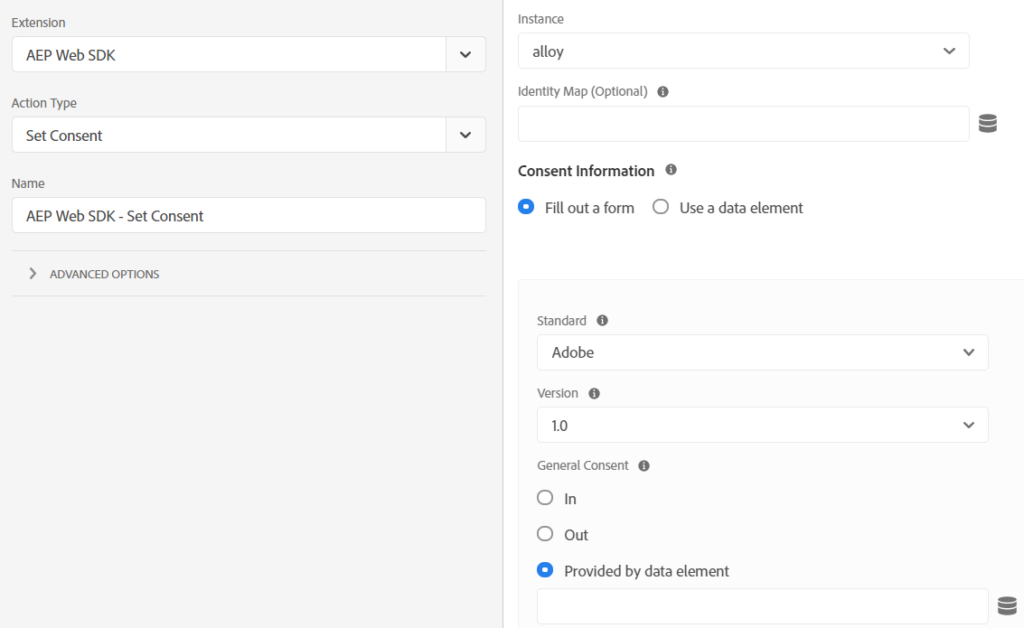
There are 2 version that you can use for the consent status. 1.0 and 2.0.
I am, at the moment, always using the 1.0 but I can imagine that the 2.0 may be used at some point.
I am just not seeing the benefit of the extra complication that comes with this implementation for my blog.
You have more details about that on this page.
Finally, you can setup a rule and set your XDM data element and in my case, I am using the web.webagedetails.PageView event:

At the end, the rule should look like the following:
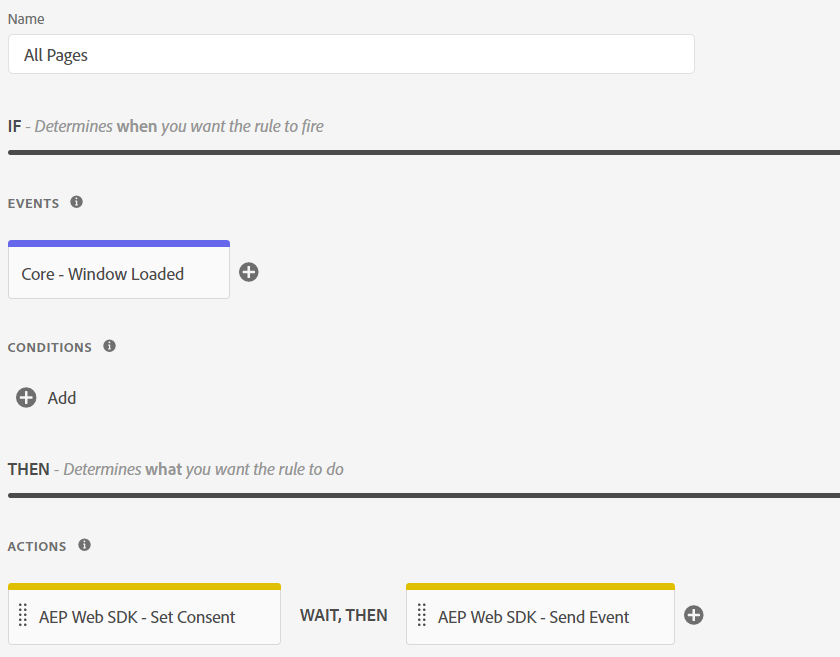
Obviously, you can add conditions if you want and as you can see, I am using the sequence option on my property so it ensures that the promises are completed before firing the next actions.
Once, you have done that, you can actually start to Q/A your implementation, but for that, it is another blog post.
Because I love doing raw things, next blog post will be to realize this with pure JavaScript.