On this article, I will try to explain the Customer Attributes and how you can implement and leverage them within your company.
As usual Customer Attributes has already been explained by Jan Exner Pedro Monjo on his blog (when it is not one, it is the other), feel free to check it out : https://www.pedromonjo.com/2017/07/customer-attributes/
However, I would like to go for a more “hands-on” view with an implementation example of that feature. Customer Attributes are often included within the default Analytics contract but few companies know what it is and how to actually use it. To be totally honest, the documentation is a bit too extensive on that and it is quite hard to get a global view on this.
What are Customer Attributes ?
I’ll try to not plagiarize Mr. Monjo here but I’ll give you some definitions.
Customer Attributes enables the possibility to assign attributes to your customers. Easy enough ? 😀
To be more specific, it will work like a classification job for your data, but instead of working on an eVar or a Prop, it will work on a specific Customer ID that you have defined and set.
The intended difference is that the customerID will be linked to your Marketing Cloud ID (mid) and therefore enable a visitor classification. This will not change the visitor attribution but it will link past, present and future data of that visitor with these attributes.
What is required for Customer Attributes ?
You can find the official list of requirements from Adobe, however I’ll give you a more comprehensive and exhaustive one.
First you need the following :
- Marketing Cloud ID service enabled (visitor API for Analytics)
- Having access to Customer Attributes within your Admin Console
If you work with Target, you would need this as well (one or the other):
- mbox.js version 58 or higher
- at.js (any version)
This is what is stated by Adobe, however, having only this kind of elements set will not bring you very far down the road.
What is very important in order to use customerID is to actually to send customer IDs to Adobe.
You will need to set that element as soon as the client is logged-in on your website (or if you have a way to identify him with a crm id).
Setting the customer id is a method from the Visitor API service (or the Marketing Cloud ID service) and it goes like this:
s.visitor.setCustomerIDs({
    "my_customer_id":{
        "id": /* INSERT CRM ID HERE */,
        "authState":Visitor.AuthState.AUTHENTICATED
    }
});
You can find the doc about the different available method here : setCustomerID – by Adobe.
You would have noticed that there are different values here :
- my_customer_id : This is your alias. Remember it, you’ll need it.
- id : it will contains your specific ID
- authState : This will tell what kind of state the user is in at the moment.
There are few things that you need to know about this :
- Authentication states (Authenticate or not) are not stored in the visitor ID cookie. They must be set for every page or application context.
- IDs are case-sensitive.
- The alias can only contains lower characters and no space.
The authentication States are not very used on Analytics or Target but if you are using Adobe Audience Manager and working with cross-device visitor authentication, this will define the way your authentication rule will trigger and where the signals (or traits) are going to be stored.
What can I use Customer Attributes for ?
One of the direct application is that it will add attributes to your users. It is like classification on your CustomerId eVar (or prop) but as classifications may be bumpy due to the limit of 500 000 unique values store within a dimension report, the customer attribute has no limits. That can be a huge bonus for large companies.
The second direct benefit and application is that those attributes will be share within the whole Marketing Cloud solutions. This means that you can use these attributes within Adobe Analytics or Adobe Target.
Another huge benefit I see is that you can import numerical data within these types of classification. You were dreaming on a way to assign numerical value to specific customers? Here you go !
Direct application of that is that you could have the Customer Lifetime Value directly within Adobe Analytics, or a propensity score to churn…. Pretty neat, isn’t it ?
You need to remember that it will link the Unique Visitor with whatever value you will submit later on. A Unique Visitor cannot have 2 attribute values. A new one will automatically over write the previous one.
I have set myCustomerID, but how do I import the data ?
To send your attributes to Adobe, you would need to go to the People manager interface.
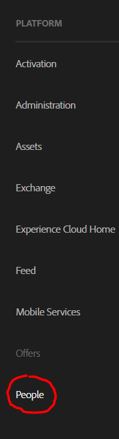
One of the possible reason why the Customer Attributes are not often used may be that it is quite hard to find on the first place.
Here the link is at the bottom of your platform possibilities.
From that we need to navigate to your the Customer Attributes itself, for the people that don’t have multi solutions with Adobe, the Audience Library would be quite empty anyway.
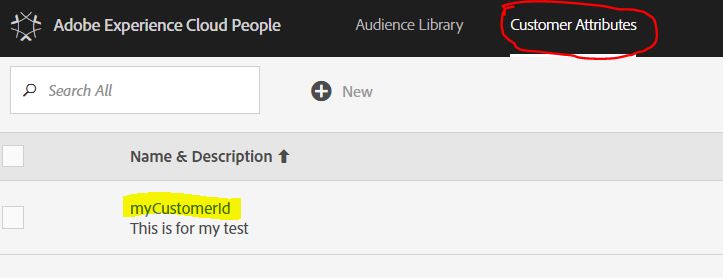
You can create click to create a new Customer Attribute. The limitations for the number of customer attribute you can create are :
- Analytics Standard: 3 total
- Analytics Premium: 200 per report suite
- Target Standard: 5
- Target Premium: 200
You will need to set your Alias ID on the configuration. Remember when I told you to remember what alias you are using for your matching ? This is the time to use it!
In my case it will be “my_customer_id”.
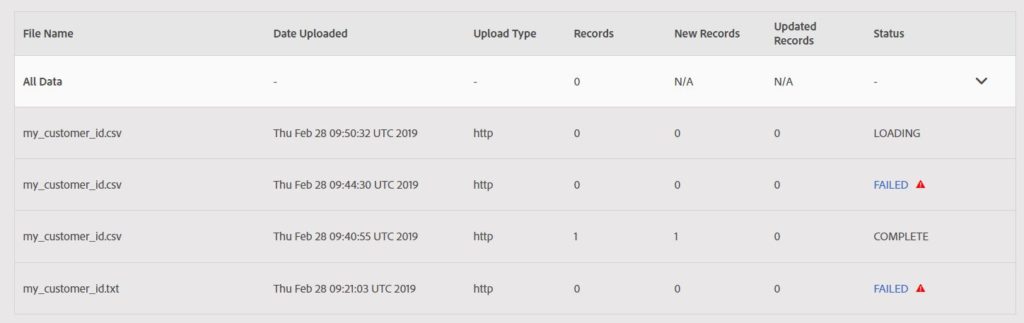
Then I need to upload my “csv” file to match my new attributes for my customer id. Some requirements are :
- Must be comma separated.
- Data must begin with the header.
- File type must be .csv only.
Something like :

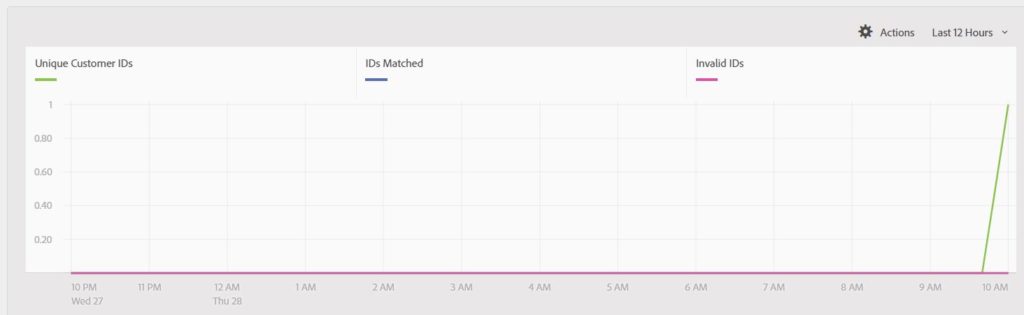
When you import those data for the first time you can actually configure the different element that you have uploaded.

The Customer Attributes interface will let you know about the different ID matched and the result in the file processing.
You also need to think about match this customerID setting with one of your tool (Analytics or Target) and if you chose Analytics, which reportSuite is going to get the data.
A bit below the previous element, you will find a panel to set up those things.
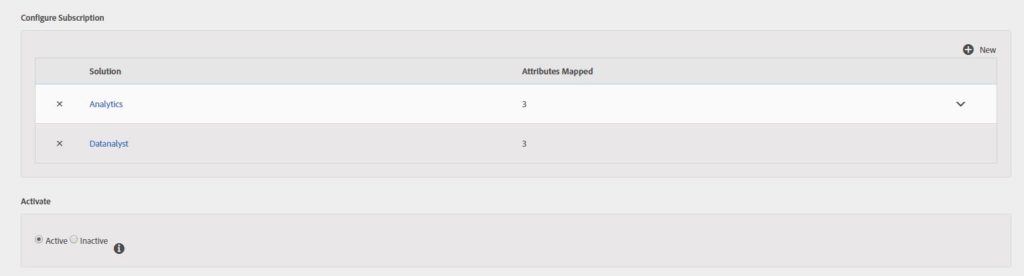
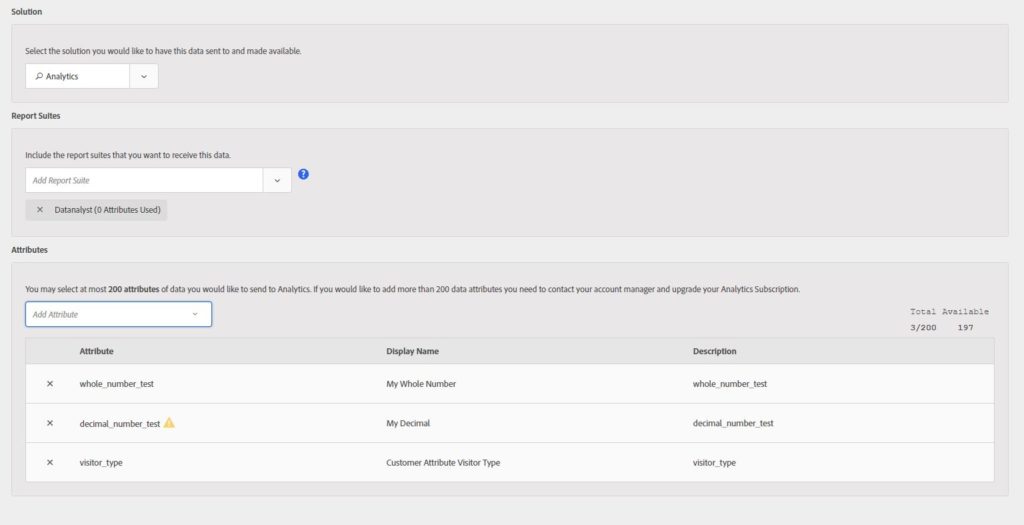
As you could see on the 2nd screenshot, you could connect the customer attributes with more than 1 reportSuite.
On this step, the limitation are enforced (ie : 3 for Analytics Standard). In practice, you can upload hundreds of column but for the export to Analytics, you can use only the limited amount assigned to your contract. (on the right, you can see that I have 197 attributes remaining)
Customer Attributes are made to handle only a few file per day, it would be recommended to have a big upload instead of multiple small ones. You can set up a FTP on the option but it will not be cover here. The minimum file size for FTP is 10 MB, and upload data there every 30 mn. (maximum file size : 4GB).
Don’t forget to set a .fin file (like classifications) and to clean your previous files.
Where can I see my Customer Attributes ?
I will mainly focus on Analytics as this is my primary tool but I’ll update the screenshots once I have set them up on Target.
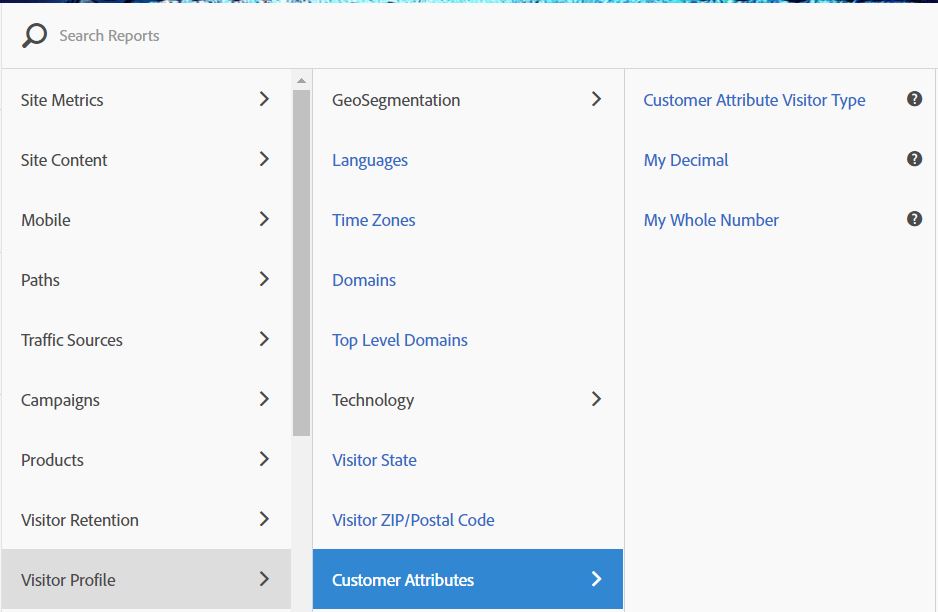
Once activated, the Customer Attributes will be accessible on 2 main interfaces:
- In the Report section, on “Visitor Profile”. This is interesting as it will validate the creation of the customer attributes within analytics. However, we won’t use them there.
- In Workspace. Once activated, you will be able to use them directly in Workspace.
- In your segments. Yes, you will be able to create segment based on your customer attributes. Isn’t it awesome ?
In Workspace, you will see that the customer attributes that are numerical (or integer) will be able to be used in 2 different ways. As a dimension, or as a metric. On top of that, you have a pre-built “Count of <customer attributes>” that will tell you how many of each value exist. (works also for string attributes).

However, you would need to take care of few things when you are using the data within Workspace.
The first thing is that the data are Unique Visitor based. All the visits that have been realized with this user, even the past ones, will have those attributes.
This could lead to biased analysis as the past data will be analyzed with present values, so keep this in mind.
The numerical data, even with comma (“.”) value will be presented as whole number in the workspace metric.

A way to change it would be to create a calculated metric that divide these values by 100.
NOTE: The customer attributes will also create a data source in Audience in order to use this information.
How can I leverage Customer Attributes in my company ?
You may have the feeling that this feature can be very useful but you have hard time to think of proper use cases for your company. I will try to give you some examples on how you can use this method on your company.
Lifetime Customer Value (Analytics)
You could use this information to import the lifetime customer value directly within Adobe. This could be a very interesting information for you in order to analyze the behavior of your user depending on their affinity to your shop in purchase history.
Affinity Products (Target)
If you have interesting CRM information on your customer database, you can calculate the affinity of your user with certain product or product Categories. You can build more advanced relationship between your customers and their purchase history than what is available on store (returned products, number of different devices used). You can use this information to target them with more relevant recommendation on Target or do A/B testing based on extra information.
Offline Attributes association (Analytics & Target)
You could assign to your unique visitors extra attributes that are not possible to find on your current website (Sex, Participation in a survey, registered in another of your website, heavy user of Customer Care,…) and use that information to analyze specific pattern or affinity to product or section of your shop.
You can also use this information in Target, in the same way that you used the affinity product information, with recommendation, experience or A/B tests.
Entry Year to shop
You could upload the date (Year) of when you customer register for the first time within you shop. According to that, you can create cluster of customers depending on your shop evolution. Users that arrives in 2018 when you shop was selling new articles. Another Example : Users that arrived in 2010, and have “Politic” as affinity. Last year that you are re-arranging your website template and the politics section was downgraded to a lower section. How did that impact their behavior ?
Rolling Average Purchase Basket – Last 3/6/12 months
One thing that I find quite problematic is that your data will be assigned to your customer from the deep past of their history. If you use Customer Life Time value, you may find hard to identify new users because these new user will have hard time to level up to very old users. It mostly depends on the algorithm you are using but that could happen. Having a rolling average should give you fresh data to cluster your customers.
I hope this article was helping you understand what are customer attributes, how to set them and how you can use them for your website.
If you have any questions or any ideas, don’t hesitate to let me know.