This article will try to summarize the workflow of Adobe Launch API and what is required in order to use the python module I developed in order to use the API.
There has been update on May 2020 :
The module used to be called pylaunch but it now launchpy. You may still see some legacy name hanging around.
Some of the documentation is also hosted on Github.
You can now also directly install the launch API python module directly from pip:pip install launchpy
Prerequisites
The prerequisites in order to use the python wrapper for the Adobe Launch API (launchpy) are the following :
- Being familiar with Adobe Launch as a Tag Manager: As much as I will explain how the Launch API is working, the experience that you could gather on this tool would really help what is the python module actually doing.
- Connector to Adobe Launch API through Adobe IO : In order to create a connector for the Launch API with adobe.io I would recommend you to follow these posts : Create a CRT File on windows & Create a JWT authentication with Python.
- Having python 3 installed and follow the requirements lists posted in the github.
- Knowing a bit of python so you can actually understands what you are doing. Extensive knowledge is not required though.
Overall, when you have realized all of these prerequisites, you can actually grab the launchpy module on my GitHub account : pitchmuc/pylaunch
I would recommend you to install that library within your python3X/Lib folders so you can access it everywhere through the import statement.
Also, make sure that you have your private key location in order to use it with the configuration file later on (see Launch API Core methods).
Launch API Workflow
I won’t do any tutorial for Launch tag manager here, I think some good materials already exists, notably Jan Exner blog and and also the official documentation is pretty good. So I will assume that you already know Launch if you are reading these lines.
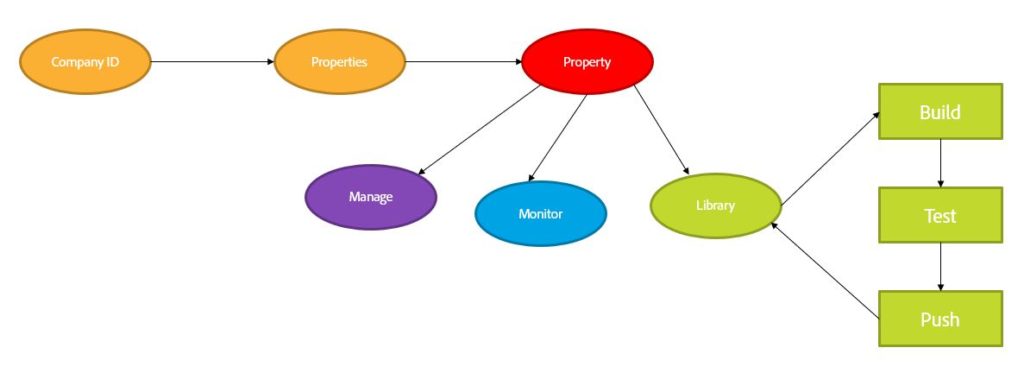
The Launch API documentation is a bit of a mess as everything is ordered alphabetically but not through the actual process that needs to be done to use that API. When you are starting using the Adobe Launch API, you would normally start working this way:
- Requesting your Token : launchpy takes care of that as long as you are providing the config file.
- Requesting your Company ID : This is the start point, from the company id, you will be able to move forward into your own company implementation.
- Requesting the properties : by requesting the properties, you will be able to discover the different element attached to each of the implementation properties of Launch for your company.
- From your property(or properties) discover their rules, data elements, extensions, libraries, etc…
- Special note on rule components that are a level deeper on this API but you may have expected it (under rules). However launchpy takes care of that as long as you request the rules beforehand.
- Create a Library and add elements to it. When you are done with your changes, the elements (extension, data elements, rules) can be added to the library.
- Build, Push, repeat: Once you start your publishing workflow, you can follow the same steps several times.
I tried to summarize the process in this graph, for the persons (like me) that are more visual:
Launchpy
I had this idea that it can come very handy to use the Launch API to facilitate my work with Launch in so many ways. When working with DTM (the previous version of Adobe Launch), it could have been frustrated to work with it as there was no easy way to automate some tasks.
Adobe Engineers have actually perfectly managed that with their new product and I think it is paving the roads for so many Tag Management system. Not only the possibility to create Extension (like JS wrapper) for your own use, you can now automate tasks and this can make life so much easier.
I would like to say that this API wrapper was really easy as the response and help of the Launch team (through their public slack channel) was really great. The API itself is very well thought and this has to be recognized! I am not part of their product or development team and thus I have not obligation to praise for their work (and I didn’t do for the other Adobe APIs) but this is how working with API should be.
Launchpy components
In order to create launchpy with the correct level of flexibility, I have decided to create separate elements (classes) that can be used interdependently from one another.
However, they are still deeply linked and one can influencing the other, so the whole understanding is required in order to use the python wrapper efficiently.
Instead of having this long paragraph, I tried to summarize the different elements in one graph (still for people like me).
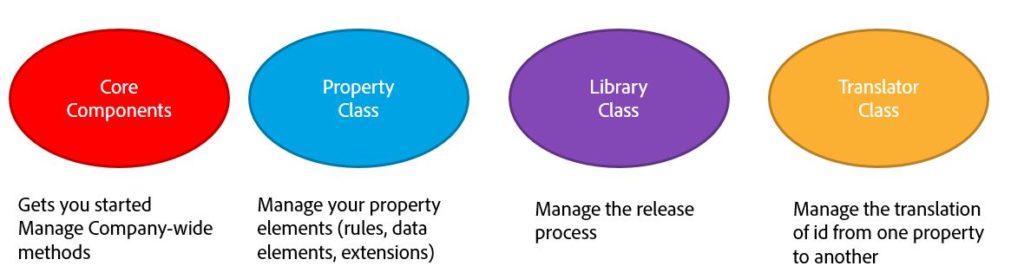
We will now explain these different components. They will all have their own post / article so you can now a bit more about them.
Core Components
The core components are the methods that are not related to any class. They can directly be call from the launchpy module and therefore don’t require any instantiation. Such methods are :
- launchpy.getCompanyID()
- launchpy.getProperties(companyid)
Property Class
When retrieving the list of properties, you can actually start to manage the properties individually by creating a class with the property object. The instance of that class will inherit all of the methods and functionalities that are required to manage that property.
Such methods are :
- property.getRules()
- property.createHost(‘name_of_host’)
Library Class
Once you are done with managing the property, you can create a Library within the property instance in order to start publishing your changes. That can (parameter that you can manage) create a Library instance.
The library instance will inherit all of the methods that are required for you to publish your changes.
Such methods are :
- myLibrary.build()
- myLibrary.transition()
Translator Class
This class has been created as one of my main use case would have been to create, or more exactly to copy paste configuration of one property to another. The Launch system is actually having its heart component on the property. It means that each property will act independently from each other, when you are creating a rule or an extension (or installing an extension), even if this is the same rule or extension on all of your property, with the same settings, it will still have a different ID in all of your properties.
Therefore, when you try to copy paste extension or rules, you would need to change their id to their corresponding values in your new property. Having a strong naming convention is here key of success for managing this copy paste problematic.
I hope that gives you a clear overview on what the launchpymodule is able to realize for you.
You may be interested in the articles that explains a bit more about the different components of the launchpy module.
| Articles | Comments |
| Adobe IO : JWT authentication | How to create JWT authentication with OpenSSL and python |
| Adobe IO : Launch API : Introduction to launchpy | What you need to know about this module |
| Adobe IO : Launch API : Core Component | The methods directly available from this module. |
| Adobe IO : Launch API : Property Class | What is the Property class and how to use it to manage your Launch properties |
| Adobe IO : Launch API : Library Class | How to manage your publishing process through launchpy, in python |
| Adobe IO : Launch API : Translator Class | A Facilitator in launchpy in order to copy paste the element from one property to another. |
| Adobe IO : Launch API : Tutorial | Video tutorial on some methods available from the launchpy module. Not everything is covered in the video. |